


While product photography is one of the most important aspects of ecommerce success (your customers need to see what they’re buying, after all), it can get expensive quickly. Whether you are an online business that is just starting out or a more established business looking for ways to save money, taking product photos yourself is likely a safer option than hiring a photographer. You don’t even need a fancy camera—all you need is your smartphone.
Today’s smartphones are constantly evolving their camera features, which means that high-quality photos are achievable for even the most novice photographers—all it takes is a great setup and a desire to wow your audience. Check out our simple and inexpensive setup solution for taking product photos using just your smartphone.
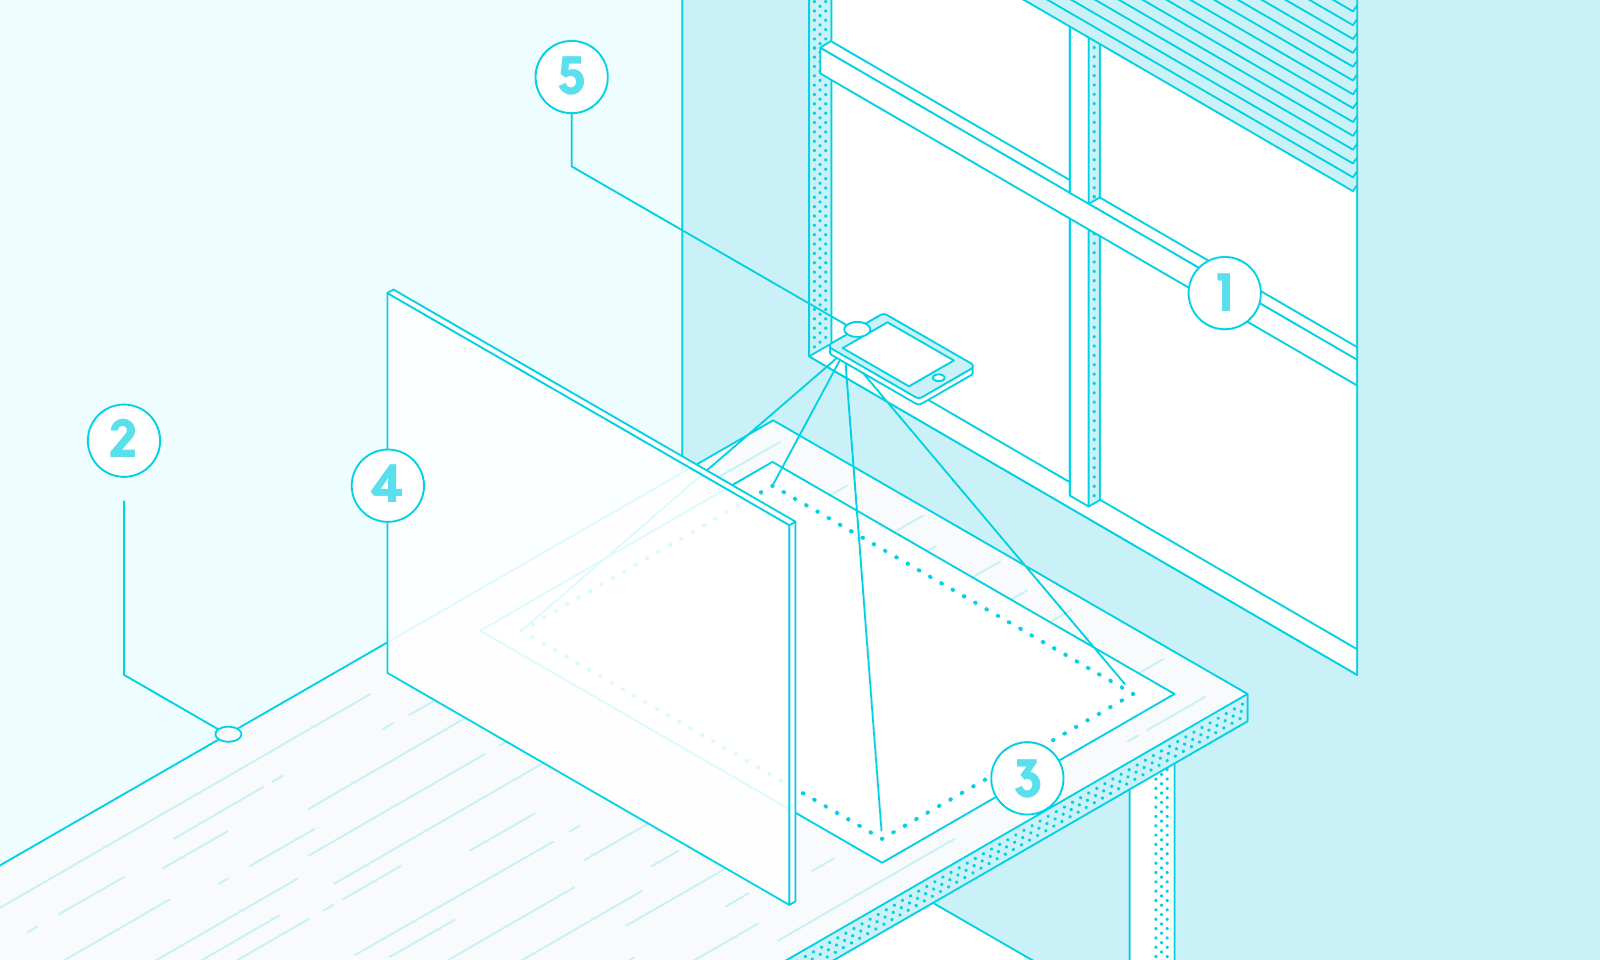
Materials you’ll need:
1. Smartphone
2. Tape
3. Foam Core 24x36
4. White Poster Board 24x36 or larger
5. Table
6. Window
How to set up your tabletop photography studio:
Step 1
Make sure your workspace is close to a window that provides ample natural light. Much more flattering than flash, natural light provides the best possible lighting option for your photos if lighting equipment is not in your budget. If it’s a rainy or cloudy day, consider postponing your shoot until the weather provides you with more sunlight.
Step 2
Move a table or other large, flat surface close to the window to set your stage. Make sure that there is enough room around the surface for you to walk around it and take photos from multiple angles.
Step 3
Set the background for your photographs—this is where something like a white poster board comes in handy. Your goal is to take shots of the product without anything around it that might distract from the product itself—plus, if you’re cross-selling your products on sites like Amazon, most require images of your product on a stark white background.
If you are planning on taking a few promotional shots as well for ads or social media, you can add additional elements like patterned fabric, plants, rocks, and more to make your photo stand out. Just make sure not to add so much that you take away from the product itself.
Step 4
Set up a barrier like a foam core using tape between your improvised stage and the rest of the room. This will ensure that all additional light sources from the rest of the room are blocked from your space. Choosing a light-colored barrier will also brighten up your workspace by reflecting some of the light from your window.
If your product will not photograph well from directly above, this will also help you create an L-shaped background so that you can take photos of your product from the side. You can add additional pieces of foam on the right and left sides as well to create a makeshift photo studio box. Just make sure you choose foam that is the same color as the posterboard you’re using on the flat surface (preferable white).
Step 5
Once you’ve placed your product in the ideal position, you can begin taking photos with your smartphone! A few quick tips: take shots of your product at multiple angles to give customers a complete idea of what your image looks like, move closer to your image instead of using the zoom feature (digital zoom features tend to make images look grainy), and try different filters to find the ideal look for your images.
Final Thoughts
Product photos don’t have to break the bank—especially when you already have a smartphone and other supplies that can do most of the work for you. By setting up your space strategically, you can take high-quality product photos even when your budget is tight.