You may want to include social media posts directly into your VOLT Store. This tutorial will cover making a custom Block with Element that embeds a Tweet or an Instagram post.
Most people have seen embedded social media content when browsing the web — social media posts placed directly inside other websites.
Often, blog posts or news articles will include a Tweet or Instagram post about some relevant current events being discussed. These embedded social media posts come directly from the social media sites, using the familiar branding and formatting of Twitter or Instagram.
However, many eCommerce stores generate sales directly from these platforms, whether from advertising or just the popularity of their content. So why not include your Tweets or Instagram posts directly in your VOLT Store?
VOLT’s powerful developmental flexibility allows you to embed a social media post inside a custom Block built using the Element platform.
This article will show you how to make a custom Block that embeds a Tweet and an Instagram Post. You will be able to build on this example depending on your own particular needs.
Note that this article will cover simple embedding using the HTML embed code provided directly by Twitter or Instagram. This tutorial will not cover the more-advanced topic of embedding a social media post dynamically using the oEmbed format.
The first step in embedding a social media post is finding a post to embed. Then, you will be copy-pasting the embed HTML code in order to place it into your VOLT Store.
Embedding a Tweet
For Twitter, you click the “Embed Tweet” button in the menu of options for the Tweet that you want to save:

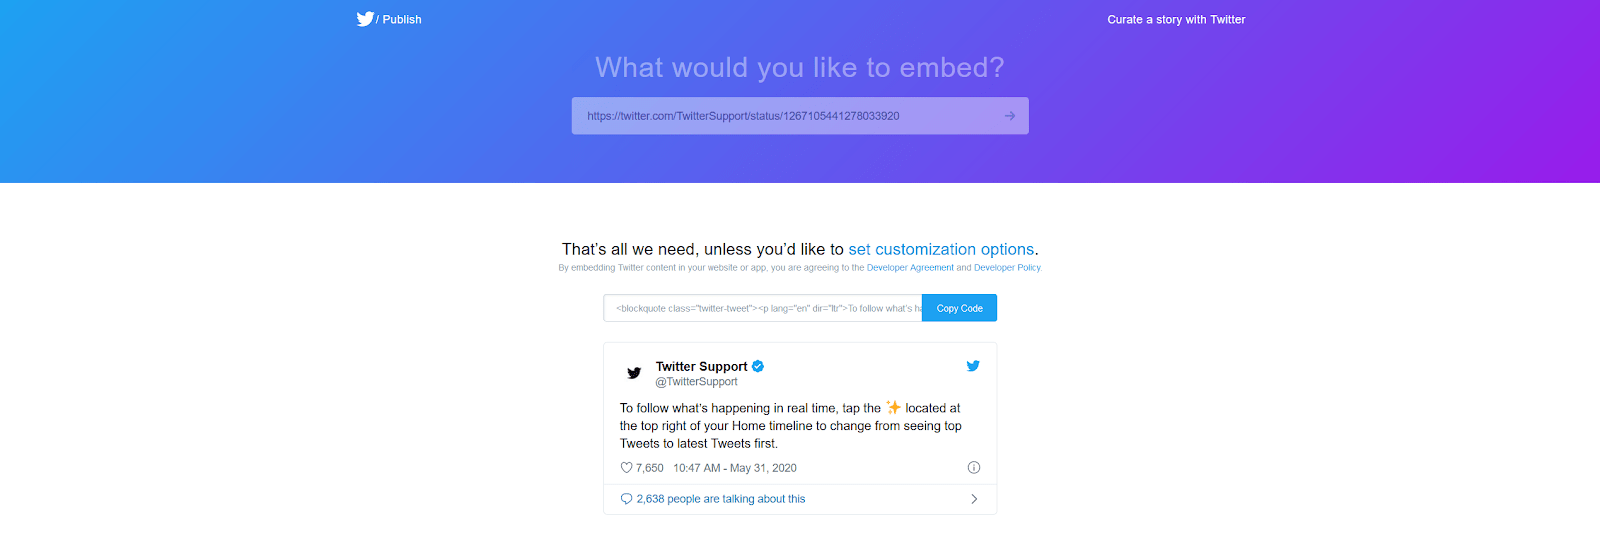
You can also browse directly to https://publish.twitter.com/# if you know the URL for the Tweet that you want to embed.
For Instagram, you click the “Embed” button in the menu of options for the post that you want to embed:

You will end up with some HTML starting with <blockquote class="twitter-tweet" … > for Twitter or <blockquote class="instagram-media" … > for Instagram.
Save this HTML text somewhere, because it will be what you will need to copy-paste into your website to embed the social media post. In our case, you will be saving it into VOLT’s Site Designer directly or as part of the configuration for the custom Block you will be creating.
Because the embed code is quite long, you will find sample embed HTML for both Twitter and Instagram as an appendix to this article.
Before continuing this tutorial, you should understand how to create and publish a custom Block to VOLT using Element .
To learn how to build custom Blocks, read the short article called “Building An Element Page Tutorial ” in the Element Platform Documentation. You may also want to watch the helpful series of YouTube videos “Element Tutorial | VOLT Learning Center” (27 minutes) that will teach you how to use Element for building a custom Block.
You will also need to be authorized to develop custom Blocks with Element in order to continue with this tutorial. Instructions are available in the article “How To Get Approved To Develop Blocks ” over in the Element Platform Documentation.
The first step is to use the Element Command Line Interface (CLI) to make a new Block called “Embed Social Block.”
First, if you need to, login to the Element CLI with your username and password for VOLT’s Site Designer:
element login
Then you need to run the following terminal commands in the directory where you want to keep your Element Blocks in order to make the Block and install its npm packages:
element new EmbedSocialBlock
cd EmbedSocialBlock
npm install
Next, you will need to initialize the Git repository in the custom Block’s directory using the terminal commands:
git init
git add -A
git commit -am "Initial Commit"
It is a good time to publish your repository online (e.g. to GitHub ) to backup before continuing.
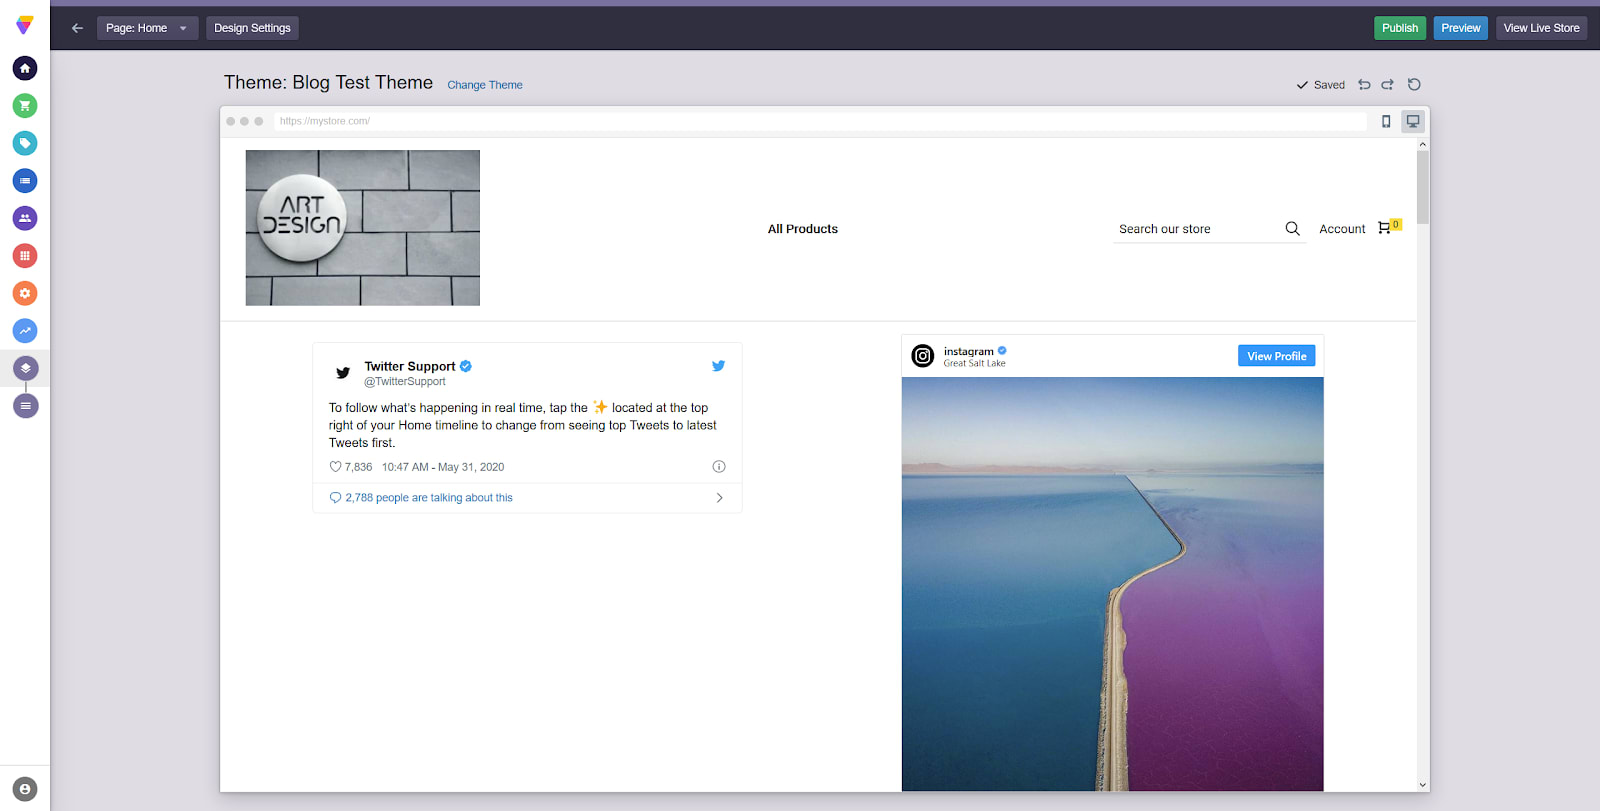
This custom Block will store the HTML code to embed the social media post so that it can be configured by the user of the custom Block in VOLT’s Site Designer.
To fully demonstrate embedding content from both Twitter and Instagram, the Block you will be building will embed one Tweet and one Instagram Post.
Open up the /src/configs.js file for the custom Block. Replace its content with this code:
import { ElementPropTypes } from "@volusion/element-proptypes"
export const configSchema = {
  embedTweetHTML: {
	label: "Twitter HTML embed code",
	type: ElementPropTypes.string,
  },
  embedInstagramHTML: {
	label: "Instagram HTML code to embed",
	type: ElementPropTypes.string,
  },
}
export const defaultConfig = {
  embedTweetHTML: `<blockquote class="twitter-tweet"> [...] </script> `,
  embedInstagramHTML: `<blockquote class="instagram-media" [...] </script>`,
}
The HTML code to embed the Tweet and the Instagram Post are saved using the “string ” Element Proptype. For the “defaultConfig” section, use your own embed HTML or the examples from the appendix at the end of this article.
Update /src/Block.js
The custom Block itself will render (or display) the HTML code to embed the social media posts that were configured in the last file using React .
Open up /src/Block.js and replace its contents with the following:
import React, { useEffect } from "react"
import { css, StyleSheet } from "aphrodite/no-important"
import { getStyles } from "./getStyles"
import { defaultConfig } from "./configs"
const Block = (props) => {
  // Get the custom Aphrodite styles to be used in this Block:
  const classes = StyleSheet.create(getStyles(props))
  // Load the helper function that will join Atomic CSS classes with Aphrodite:
  const joinClasses = props.joinClasses
  // Destructure the HTML embed code from the props:
  const { embedTweetHTML, embedInstagramHTML } = props
  // React's Effect Hook (useEffect) will run code when the Block is rendered:
  useEffect(() => {
	// Add a link to the external Twitter script file:
	const twitterScript = document.createElement("script")
	twitterScript.setAttribute("src", "https://platform.twitter.com/widgets.js")
	twitterScript.setAttribute("async", true)
	const tweetElement = document.getElementsByClassName("twitter-tweet")[0]
	// Only add the Twitter script if there is a Tweet to embed:
	tweetElement ? tweetElement.appendChild(twitterScript) : null
	// Add a link to the external Instagram script file:
	const instagramScript = document.createElement("script")
	instagramScript.setAttribute("src", "https://www.instagram.com/embed.js")
	instagramScript.setAttribute("async", true)
	const instaElement = document.getElementsByClassName("instagram-media")[0]
	// Only add the Instagram  script if there is an Instagram Post to embed:
	instaElement ? instaElement.appendChild(instagramScript) : null
  }, [])
  // Passing [] as useEffect's second parameter will run the code just once.
  // Combine the Tweet and the Instagram Post into a single HTML string:
  const embedHTML = embedTweetHTML + embedInstagramHTML
  // For HTML markup, React requires an object with the __html property:
  const outputAsMarkup = { __html: embedHTML }
  // Make a <div> element based on the banner text using the custom styles:
  const outputDiv = (
	<div
  	// Combine Atomic CSS classes with custom styles using joinClasses:
  	className={joinClasses(
    	"ma0 pa3 flex justify-around",
    	css(classes.banner)
  	)}
  	// The class ma0 sets all margins to 0, and pa3 sets padding to 1rem.
  	// flex & justify-around enable CSS flexbox with space around the items.
  	// dangerouslySetInnerHTML will render HTML markup, except <script> tags:
  	dangerouslySetInnerHTML={outputAsMarkup}
	></div>
  )
  // Google AMP pages can't load external JavaScript, so the social media embed
  // won't be able to load on the AMP version of the Block. For the AMP page,
  // props.utils.isAmpRequest is true, so return null to render an empty Block:
  return props.utils.isAmpRequest ? null : outputDiv
}
Block.defaultProps = defaultConfig
export default Block
In React, the method to display the HTML markup contained inside a React component is called dangerouslySetInnerHTML (for reasons that are explained here ). This is equivalent to the Element.innerHTML method in vanilla JavaScript. These methods allow you to render (or display) HTML so that it will be displayed by the browser as HTML instead of as text.
The Block is styled using Atomic CSS classes to provide basic styling for the Block, including classes from the spacing.css and flexbox.css files to control margin , padding , and CSS flexbox settings. For the complete list of all of the classes available in Atomic CSS, please refer to the atomic.css file from the element-atomic-css GitHub repository.
This particular Block does not actually need custom styles from Aphrodite, but they are included for consistency purposes. For details on adding custom styles to Element, please see the article “Styling Your Block with CSS ” in the Element Platform Documentation.
The code to load the necessary scripts for Twitter and Instagram are discussed in the next section.
The custom Block code above loads the Twitter widget and Instagram widget inside a function called the Effect Hook (useEffect) , which is one of the React Hooks.
These widgets are external JavaScript files that actually load the Tweet and Instagram Post and are necessary to load the scripts. If you inspect the embed HTML code, you will see <script> tags at the end that link to these widgets. However, dangerouslySetInnerHTML will not load <script> tags, so they need to be loaded separately in the component.
For those familiar with React’s class-based lifestyle methods, useEffect is similar to componentDidMount and componentDidUpdate by default, meaning that code when the Block mounts (or loads) and again every time the Block updates.
However, passing an empty array [] to useEffect as its second parameter causes the code in the Effect Hook to run only once, just when the Block first loads.
If you put the code to load the script inside the main part of the component (the render function) , without using the Effect Hook, then the external script would get added to the page repeatedly, on every render (meaning every time that the Block refreshes itself).
Element has an addScript helper function (available in the Block Utils) that adds external JavaScript files to the <head> HTML element of the page. Because of how the Twitter widget works, it is not compatible with the addScript function.
Google’s AMP is a super-fast, mobile version of a website that shows up in Google search results. VOLT supports AMP out-of-the-box with no additional configuration required.
The method of embedding social media posts used in this article will not work on AMP pages, because AMP has restrictions on external JavaScript files. Both the Twitter and Instagram embed widgets require loading external JavaScript files.
In the above /src/Block.js file, you probably noticed that there is a check made to “props.utils.isAmpRequest ” — which is true on the AMP version of your VOLT store. For the AMP page, the Block is provided the value of null , which causes the Block not to render anything at all.
Since AMP won’t render the custom JavaScript, nothing will be displayed for the social media post on the AMP version of the VOLT Store. For help embedding Tweets and Instagram Posts on AMP pages, please see the AMP documentation for amp-twitter and amp-instagram.
Having configured the custom Block, you can launch it locally to see how sure it works.
Launch your local development server using the npm start (npm run start) command from the Element Block’s directory:
npm run start
This will open up a new browser window (http://localhost:4000/ ) so you can look at the custom Block.
The next part of the article will discuss publishing the Block to the VOLT Store.
In order to publish your Block and start using it in VOLT’s Site Designer, all unit tests for the custom Block must pass.
This tutorial will not cover address writing unit tests to cover the Embed Social Block, so you will need to modify the test files to skip the tests.
To skip the tests, open up the /__test__/Block.spec.js file and add “.skip” after the keyword describe:
describe.skip("The Block", () => {
Add the same “.skip” text to the /__test__/AMP.spec.js file:
describe.skip('The Block when loaded over AMP', () => {
This will skip all of the tests for now, which will allow you to publish the new custom Block to VOLT. It is recommended that you always include tests for your custom Blocks, as doing so will prevent bugs when making future updates. When you have finished with both test files, you can build and publish the custom Block.
To publish the custom Block, you need to stop the local development server (npm start) if it is still running by using Ctrl+C to terminate the running process.
Build the Block using the npm run build command on the command line:
npm run build
Then, publish the Block using the Element CLI with the element publish command:
element publish -n "Embed Social Block"
Be sure to use the required -n flag (for “name”) to give the custom Block a name, which needs to be in quotes. You will then be prompted to select a category for the Block using the arrow keys. Choose Features and hit the Enter key.
You will see a warning message that the file “thumbnail.png” is missing. This happens because you do not have a thumbnail image to show for the preview of the custom Block in VOLT’s Site Designer.
For help adding a thumbnail image, please watch the video How to Create a Thumbnail for Your Block | Element Tutorial | VOLT Resource Center (4 minutes) on YouTube, or you can read the Element Platform Documentation for the Element CLI’s publish command.
Having published the custom Block, it will now be available for you to start using in VOLT’s Site Designer.
The new custom Block is still in development (or “staging”) and will not be shown to customers if you click the Publish button in VOLT’s Site Designer. The next section will describe updating the Block as well as releasing the Block from staging to production.
If you make changes to the custom Block, you will need to rebuild the custom Block with the command npm run build. Then, you can update the current minor version of the Block with the element update command:
npm run build
element update
For more information on versioning of custom Blocks, please refer to How To Track Block Versions from the Element Platform Documentation.
Custom Blocks are in staging when you first publish or update them. Blocks in staging are only visible on the preview version of the VOLT Store in Site Designer, not in live VOLT Stores.
To release the custom Block and make it live on all public VOLT Stores using that Block, you need to use the command element release along with the -n “Notes” flag:
element release -n "Current Version's Release Notes"
Note that the release notes will need to be in quotes. Release notes are recommended.
The release command will ask you to confirm on the command line (using “Y” for yes or “n” for no). Once you release the first version of the custom Block, it will be shown immediately on all VOLT Stores that have the custom Block installed. For more information, please refer to the Element Platform Documentation for the Element CLI’s release command .
You should track the version release using Git. When developing from a publicly-released version, it is also recommended that you work from new Git branches. Enter the following terminal commands:
git commit -am "Version 1.0"
git tag 1.0
You have now released a custom Block that embeds a Tweet and Instagram Post into your VOLT Store. Users in VOLT’s Site Designer can switch out the Tweet and Instagram Post by changing the embed HTML code.
Embedding social media content into your VOLT Store offers the possibility of displaying your social media directly to customers shopping your store.
In this tutorial, you learned how to build a custom Block using Element to show off your social media posts. The Block loads the HTML code provided by Twitter or Instagram and embeds it into your VOLT Store. When you configure the Block inside VOLT’s Site Designer, you can easily swap the HTML code with any other posts that you would like to feature.
Hopefully this tutorial has helped you understand how to unlock VOLT’s developmental flexibility for featuring social media on your VOLT Store.
Appendix: Embed Code
The following code shows the complete text for the “defaultConfig” portion of the /src/configs.js file.
export const defaultConfig = {
embedTweetHTML: `<blockquote class="twitter-tweet"><p lang="en" dir="ltr">To follow what’s happening in real time, tap the ✨ located at the top right of your Home timeline to change from seeing top Tweets to latest Tweets first.</p>— Twitter Support (@TwitterSupport) <a href="https://twitter.com/TwitterSupport/status/1267105441278033920?ref_src=twsrc%5Etfw">May 31, 2020</a></blockquote> <script async src="https://platform.twitter.com/widgets.js" charset="utf-8"></script> `,
embedInstagramHTML: `<blockquote class="instagram-media" data-instgrm-captioned data-instgrm-permalink="https://www.instagram.com/p/CA3B8C1M3B_/?utm_source=ig_embed&utm_campaign=loading" data-instgrm-version="12" style=" background:#FFF; border:0; border-radius:3px; box-shadow:0 0 1px 0 rgba(0,0,0,0.5),0 1px 10px 0 rgba(0,0,0,0.15); margin: 1px; max-width:540px; min-width:326px; padding:0; width:99.375%; width:-webkit-calc(100% - 2px); width:calc(100% - 2px);"><div style="padding:16px;"> <a href="https://www.instagram.com/p/CA3B8C1M3B_/?utm_source=ig_embed&utm_campaign=loading" style=" background:#FFFFFF; line-height:0; padding:0 0; text-align:center; text-decoration:none; width:100%;" target="_blank"> <div style=" display: flex; flex-direction: row; align-items: center;"> <div style="background-color: #F4F4F4; border-radius: 50%; flex-grow: 0; height: 40px; margin-right: 14px; width: 40px;"></div> <div style="display: flex; flex-direction: column; flex-grow: 1; justify-content: center;"> <div style=" background-color: #F4F4F4; border-radius: 4px; flex-grow: 0; height: 14px; margin-bottom: 6px; width: 100px;"></div> <div style=" background-color: #F4F4F4; border-radius: 4px; flex-grow: 0; height: 14px; width: 60px;"></div></div></div><div style="padding: 19% 0;"></div> <div style="display:block; height:50px; margin:0 auto 12px; width:50px;"><svg width="50px" height="50px" viewBox="0 0 60 60" version="1.1" xmlns="https://www.w3.org/2000/svg" xmlns:xlink="https://www.w3.org/1999/xlink"><g stroke="none" stroke-width="1" fill="none" fill-rule="evenodd"><g transform="translate(-511.000000, -20.000000)" fill="#000000"><g><path d="M556.869,30.41 C554.814,30.41 553.148,32.076 553.148,34.131 C553.148,36.186 554.814,37.852 556.869,37.852 C558.924,37.852 560.59,36.186 560.59,34.131 C560.59,32.076 558.924,30.41 556.869,30.41 M541,60.657 C535.114,60.657 530.342,55.887 530.342,50 C530.342,44.114 535.114,39.342 541,39.342 C546.887,39.342 551.658,44.114 551.658,50 C551.658,55.887 546.887,60.657 541,60.657 M541,33.886 C532.1,33.886 524.886,41.1 524.886,50 C524.886,58.899 532.1,66.113 541,66.113 C549.9,66.113 557.115,58.899 557.115,50 C557.115,41.1 549.9,33.886 541,33.886 M565.378,62.101 C565.244,65.022 564.756,66.606 564.346,67.663 C563.803,69.06 563.154,70.057 562.106,71.106 C561.058,72.155 560.06,72.803 558.662,73.347 C557.607,73.757 556.021,74.244 553.102,74.378 C549.944,74.521 548.997,74.552 541,74.552 C533.003,74.552 532.056,74.521 528.898,74.378 C525.979,74.244 524.393,73.757 523.338,73.347 C521.94,72.803 520.942,72.155 519.894,71.106 C518.846,70.057 518.197,69.06 517.654,67.663 C517.244,66.606 516.755,65.022 516.623,62.101 C516.479,58.943 516.448,57.996 516.448,50 C516.448,42.003 516.479,41.056 516.623,37.899 C516.755,34.978 517.244,33.391 517.654,32.338 C518.197,30.938 518.846,29.942 519.894,28.894 C520.942,27.846 521.94,27.196 523.338,26.654 C524.393,26.244 525.979,25.756 528.898,25.623 C532.057,25.479 533.004,25.448 541,25.448 C548.997,25.448 549.943,25.479 553.102,25.623 C556.021,25.756 557.607,26.244 558.662,26.654 C560.06,27.196 561.058,27.846 562.106,28.894 C563.154,29.942 563.803,30.938 564.346,32.338 C564.756,33.391 565.244,34.978 565.378,37.899 C565.522,41.056 565.552,42.003 565.552,50 C565.552,57.996 565.522,58.943 565.378,62.101 M570.82,37.631 C570.674,34.438 570.167,32.258 569.425,30.349 C568.659,28.377 567.633,26.702 565.965,25.035 C564.297,23.368 562.623,22.342 560.652,21.575 C558.743,20.834 556.562,20.326 553.369,20.18 C550.169,20.033 549.148,20 541,20 C532.853,20 531.831,20.033 528.631,20.18 C525.438,20.326 523.257,20.834 521.349,21.575 C519.376,22.342 517.703,23.368 516.035,25.035 C514.368,26.702 513.342,28.377 512.574,30.349 C511.834,32.258 511.326,34.438 511.181,37.631 C511.035,40.831 511,41.851 511,50 C511,58.147 511.035,59.17 511.181,62.369 C511.326,65.562 511.834,67.743 512.574,69.651 C513.342,71.625 514.368,73.296 516.035,74.965 C517.703,76.634 519.376,77.658 521.349,78.425 C523.257,79.167 525.438,79.673 528.631,79.82 C531.831,79.965 532.853,80.001 541,80.001 C549.148,80.001 550.169,79.965 553.369,79.82 C556.562,79.673 558.743,79.167 560.652,78.425 C562.623,77.658 564.297,76.634 565.965,74.965 C567.633,73.296 568.659,71.625 569.425,69.651 C570.167,67.743 570.674,65.562 570.82,62.369 C570.966,59.17 571,58.147 571,50 C571,41.851 570.966,40.831 570.82,37.631"></path></g></g></g></svg></div><div style="padding-top: 8px;"> <div style=" color:#3897f0; font-family:Arial,sans-serif; font-size:14px; font-style:normal; font-weight:550; line-height:18px;"> View this post on Instagram</div></div><div style="padding: 12.5% 0;"></div> <div style="display: flex; flex-direction: row; margin-bottom: 14px; align-items: center;"><div> <div style="background-color: #F4F4F4; border-radius: 50%; height: 12.5px; width: 12.5px; transform: translateX(0px) translateY(7px);"></div> <div style="background-color: #F4F4F4; height: 12.5px; transform: rotate(-45deg) translateX(3px) translateY(1px); width: 12.5px; flex-grow: 0; margin-right: 14px; margin-left: 2px;"></div> <div style="background-color: #F4F4F4; border-radius: 50%; height: 12.5px; width: 12.5px; transform: translateX(9px) translateY(-18px);"></div></div><div style="margin-left: 8px;"> <div style=" background-color: #F4F4F4; border-radius: 50%; flex-grow: 0; height: 20px; width: 20px;"></div> <div style=" width: 0; height: 0; border-top: 2px solid transparent; border-left: 6px solid #f4f4f4; border-bottom: 2px solid transparent; transform: translateX(16px) translateY(-4px) rotate(30deg)"></div></div><div style="margin-left: auto;"> <div style=" width: 0px; border-top: 8px solid #F4F4F4; border-right: 8px solid transparent; transform: translateY(16px);"></div> <div style=" background-color: #F4F4F4; flex-grow: 0; height: 12px; width: 16px; transform: translateY(-4px);"></div> <div style=" width: 0; height: 0; border-top: 8px solid #F4F4F4; border-left: 8px solid transparent; transform: translateY(-4px) translateX(8px);"></div></div></div></a> <p style=" margin:8px 0 0 0; padding:0 4px;"> <a href="https://www.instagram.com/p/CA3B8C1M3B_/?utm_source=ig_embed&utm_campaign=loading" style=" color:#000; font-family:Arial,sans-serif; font-size:14px; font-style:normal; font-weight:normal; line-height:17px; text-decoration:none; word-wrap:break-word;" target="_blank">#HelloFrom Utah’s Great Salt Lake. We’re dreaming of these colors, where the water on one side of the causeway is blue and the other is pink due to a type of bacteria that flourishes when the salt level rises. Photo by @braybraywoowoo</a></p> <p style=" color:#c9c8cd; font-family:Arial,sans-serif; font-size:14px; line-height:17px; margin-bottom:0; margin-top:8px; overflow:hidden; padding:8px 0 7px; text-align:center; text-overflow:ellipsis; white-space:nowrap;">A post shared by <a href="https://www.instagram.com/instagram/?utm_source=ig_embed&utm_campaign=loading" style=" color:#c9c8cd; font-family:Arial,sans-serif; font-size:14px; font-style:normal; font-weight:normal; line-height:17px;" target="_blank"> Instagram</a> (@instagram) on <time style=" font-family:Arial,sans-serif; font-size:14px; line-height:17px;" datetime="2020-05-31T17:00:38+00:00">May 31, 2020 at 10:00am PDT</time></p></div></blockquote> <script async src="//www.instagram.com/embed.js"></script>`,
}